Concrete Repair Mortars for Heavy Traffic Areas
Project Overview
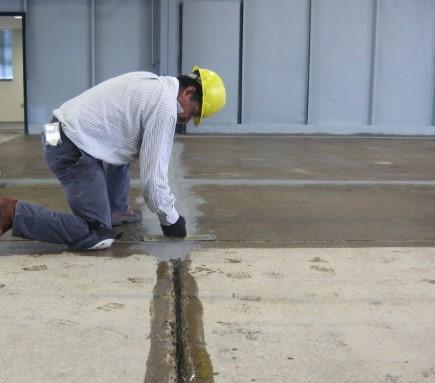
Below is the process of repairing floor defects in an industrial facility using TREFLITE™, an epoxy mortar/resurfacer. Before applying a coating to the floor, it's crucial to address any cracks, holes, or surface imperfections to ensure a smooth and durable finish.
Step-by-Step Guide to Floor Defect Repair
- Identify and Prepare the Defects
The first step is to locate all floor defects such as cracks, holes, and uneven surfaces. These are cleaned thoroughly to ensure proper adhesion. - Apply TREFLITE™ Epoxy Mortar/Resurfacer
TREFLITE™ is applied to the damaged areas. It fills deep cracks and smooths out surface imperfections. This epoxy product is designed for industrial applications exposed to heavy traffic and harsh environments, ensuring long-lasting repairs due to it’s high strength. - Let the Epoxy Cure
After applying TREFLITE™, the epoxy resurfacer, allow it to cure properly. This step ensures that the repaired areas are strong and stable before the final coating is applied.

Why Use TREFLITE™ for Floor Repairs?
- Durability: TREFLITE™ is designed for applications where excellent wear characteristics and strength are required. It is recommended for heavy traffic areas, forklift traffic and steel wheel equipment production areas.
- Smooth Finish: It fills in cracks and holes, ensuring a smooth, even surface for coating application.
A Foundation for Success
By repairing floor defects before applying a coating, you create a more durable, smooth surface that will stand up to wear and tear in industrial settings. Using TREFLITE™ ensures that your floor not only looks great but also performs under heavy traffic and challenging conditions. This preparation is key to a long-lasting, professional finish.
FAQS for Epoxy Mortars
FAQ 1: What type of concrete repair mortar should I use for floor repairs?
For floors, especially in high-traffic or industrial areas, choose a high-strength, fast-setting repair mortar that’s designed to withstand abrasion and mechanical loads. Patch repair mortars are ideal for smoothing uneven surfaces, filling deeper holes and covering up floor damage.
FAQ 2: How do I prepare a damaged concrete floor before applying repair mortar?
Start by removing all loose or damaged concrete, dirt, grease, and surface contaminants. Follow the mortar manufacturer’s instructions closely.
FAQ 3: When can the repaired floor be used again after applying the mortar?
Many floor repair mortars are traffic-ready within a few hours, especially rapid-set formulations. However, full cure and maximum strength may take 24–72 hours. Always check the product datasheet for specific traffic and cure times to avoid premature use and potential failure.
Not sure which repair products are right for you?
Contact our team today.

![]()
![]()
![]()
![]()